

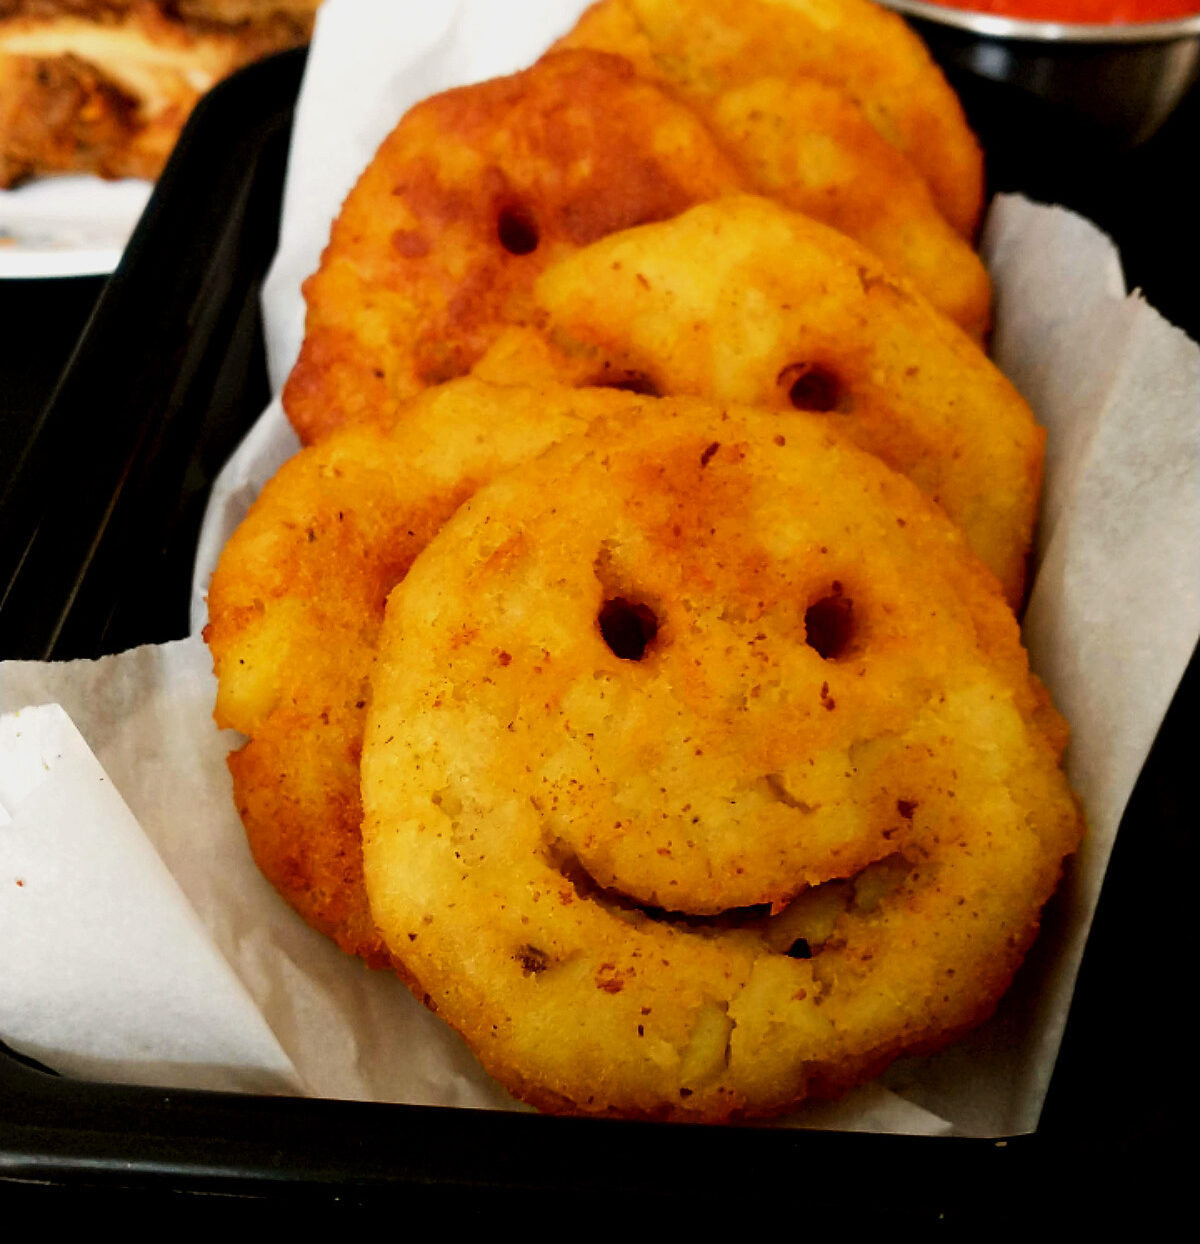
Allergy Friendly Homemade Smilies are gluten and dairy free. Serve as a side with your favorite dips and main meals. These are so easy to make your kids can help too. The main part is akin to making mashed potatoes. But, you don’t just leave them like that. You make them into a patty, put a smile on them, and fry them. 🙂
Many readers wonder, “Are smiley fries gluten free?” The answer depends on the brand. While potatoes themselves are naturally gluten free, some packaged smiley fries contain wheat based additives. That’s why making them at home is the best choice. Our recipe is naturally gluten free, allergy friendly, and perfect for kids and adults alike.
Making the recipe allergy friendly
This recipe calls for flour and milk, so I used
- Gluten Free all purpose flour – so that the potatoes can hold shape.
- Dairy Free Milk – to mash the potatoes.
You can also add dairy free butter instead of the oil, if you like.
Crispy Allergy Friendly Homemade Smilies
- To make the smilies crispy use corn starch or corn flour instead of the flour.
- To make the smiley fries without corn free as well use rice flour.
- Another way is to coat with gluten free bread crumbs before frying.
Seasonings
I have only used salt and pepper. You can use garlic powder to give the smilies more flavour. If you like spicy, you can add a little bit of red chili powder. You can also use your favourite herbs.
Shaping the allergy friendly homemade smilies
It is very easy to shape the fries. You will need a small straw and a tablespoon. First, you need to mash the potatoes. Then, season them. Take a tablespoon of the mash and shape it into a patty. Make sure the patty is 1/2 cm thick with thick edges or it will break.
With the help of the straw, make the eyes. Make sure you leave some space from the edges. Otherwise, it will break. Then with the tablespoon put in the smile.
Cooking the allergy friendly smilies
I like my fries deep fried. Any other way just does not give the same flavour. However, for a healthier version, you can either bake or air fry them.
Serving Suggestion
Serve as a side with Allergyfriendly Chicken Zinger Burger.
Your Smiley Fries Questions Answered
Most store bought smiley fries are made from potatoes but often include added starches or coatings that may contain gluten. Always check the packaging carefully if you’re buying frozen versions. The good news is that our homemade allergy friendly smiley fries recipe uses simple, gluten free ingredients, so you can enjoy them safely without worrying about hidden allergens.
Yes! you can bake Smiley fries for a lighter, healthier alternative to frying. Simply place your shaped smiley fries on a parchment lined baking sheet, brush lightly with oil, and bake until golden and crisp. Baking reduces the fat content while still delivering the same crunchy texture and playful look that kids love.
Yes! you can prepare smiley fries in advance and stored for later use. After shaping the smiley faces, place them on a tray and freeze until firm. Once frozen, transfer them to an airtight container or freezer bag. When you’re ready to enjoy, simply bake or fry them straight from the freezer (no need to thaw). This makes them a convenient, allergy friendly snack you can have ready anytime.

Allergy Friendly Homemade Smilies
Course: Recipes, SidesCuisine: AmericanDifficulty: Easy30
smilies15
minutes45
minutes19
kcal1
hourHomemade Allergy Friendly Smilies are gluten and dairy free. A very easy recipe, serve as a side with your favorite dips and main meals.
Ingredients
2 Potatoes
1/2 teaspoon Salt
1/2 teaspoon Black Pepper
1/4 cup Gluten Free Flour
1/4 cup Dairy Free Milk
1 tablespoon Olive Oil
- Utensils you will need
spoon
small hole straw
Steps
- Boil the potatoes, until done. Cool and peel.
- Add salt, pepper, oil and flour. then mash and adjust the seasoning to taste.

- Make into small patties – 1/2 cm thick. Then pierce two holes with the straw to make eyes.

- With the help of the spoon make the mouth. Make sure the spoon is facing the eyes, otherwise you will have a mad emoji instead of a smiley.


- Now fry till golden brown and enjoy with your favourite dip!


Recipe Video
Cook’s Notes
- Make sure the patty is 1/2 cm thick with thick edges or it will break.
- leave some space around the edges when making the eyes and mouth or again it may break.
- Use cornstarch,rice starch or gluten free bread crumbs to make the smilies crispier.
Nutrition Facts
30 servings per container
Serving Size1 Smilie
Calories19
- Amount Per Serving% Daily Value *
- Total Fat
8g
11%
- Saturated Fat 1g 5%
- Sodium 41mg 2%
- Amount Per Serving% Daily Value *
- Total Carbohydrate
3g
2%
- Total Sugars 1g
- Protein 7g 15%
- Potassium 63mg 2%
- Magnesium 3mg 1%
* The % Daily Value tells you how much a nutrient in a serving of food contributes to a daily diet. 2,000 calories a day is used for general nutrition advice.
Rate this recioe:
Pin it for Later

Discover more from Limitless Allergies
Subscribe to get the latest posts sent to your email.

So cute! My kids will love this (if I share with them that is lol).
what a cute “hashbrown” like cake for the kids!
These are so darn cute! Never even thought about making smile fries from scratch at home so I love the tips in this recipe. Thanks for sharing.
thank you
These little similes look like such fun and so easy to make. Going to prepare them for my son as i have all the ingredients in!
Will love to make these for my little ones. YUM! I like the smiley faces too!
These are so much fun! I have a feeling that my daughter would love them. 🙂
How cute and fun! My kids would love these!
Such a fun recipe! These would be such a huge hit with my kids. I love that these smilies are gluten and dairy free.
This looks absolutely easy and delicious.